Controlling your Fire TV with Python
For those who enjoy controlling things around the house simply using python code on any device, this should be of interest to you. I personally like all the smart home devices, and having everything automated, the fewer remotes in the house the better. So in this article I will show you how I was able to use python to send the same messages to my Fire TV as the remote would.
This whole process relies on the ADB (Android Debug Bridge) debugging feature, that is available on many android devices. In this case it will allow us to send signals to the fire-stick using keycodes from python.
So to get started, as always we will need all the right libraries for this little project.

The OS library should be available by default, however the other three packages are accessible after doing a pip install of adb-shell.
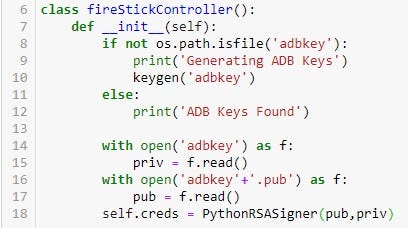
We want to start by creating a fire-stick controller class with an initialisation function as such:

The connection to the fire-stick requires a public and private key, and this is where the package ‘keygen’ comes in handy. So in our initialisation function, we want to first check if a key already exists, and if not, we will create a new one. This is done using an if statement, to check if the file is in the same directory as the python file, and if not the ‘keygen’ method will be used to create a new one. The credential files need to be opened and read into python, and then encrypted using our imported function ‘PythonRSASigner’, and the code now looks as follows:

It is helpful to add some ‘print’ functions within the ‘init’ function, to make it clear which steps were followed when running it.
The next step is to create a connection to our fire-stick. To do this we will add a new method called ‘addDevice’ which will inherit from the ‘init’ function, and take an additional parameter which is the IP address of the fire-stick. This is easy to find on your fire TV by going to:
Settings → My Fire TV → About → Network
From there on the right hand side of the screen you can find the IP address, and can save it as a variable in your code. Bare in mind that unless you set a static IPV4 address on your home network, this can change from time to time.
So in our new method, the first thing to do is define the device on the adb debugging server, which is done using the ‘AdbDeviceTcp’ function imported at the start. This function will take 3 arguments: the IP address, a default port which should be set to 5555, and then a timeout duration. So the start of this method looks something like:

Before we use our credentials to create the connection, we need to make sure that any existing connections are closed, and this is easiest with a ‘try block’. So we will ‘try’ to close an existing connection to the fire-stick, handle the ‘except’ by printing ‘no devices currently connected’ and add an ‘else’ which will create a new connection. Finally the device we have defined and connected needs to be returned. So our addDevice method now looks like this:

So now when we create an instance of this class, we will be able to get it to connect to our fire-stick, however at this point it doesn’t have any other interaction. So our next task is to create more methods that allow us to send commands such as play/pause, select, home etc…
To create a method that sends a command is very simple, and follows the same template for all the buttons it is trying to mimic. Using the ‘select’ button as an example, we will begin by defining a method in our class called ‘select’, that inherits the device that was returned from our previous addDevice method. With just one line of code, we can send a command to the fire-stick. The command looks like:

Both arguments for the _service( , ) method need to be ‘b’ strings, meaning the information is sent as bytes. The first argument means it sends a shell command in the adb server, and the second argument will take different numbers in place of the ‘#’ which have different numerical keycodes that represent the remote buttons. For a full list of which keycodes correspond to which button you can visit this page: “https://gist.github.com/kibotu/76be44aaa1174bdd252a49a1cd7a02f9”
So the full select method is as simple as:

You can add methods for all the buttons if you want, or only for those you will need.
Our python script is almost ready, all that’s left is to create an instance of this class and get it connected to your fire-stick, and this is very easy!
We just need to add these few lines of code:

Now when you run this code it should connect to your fire-stick, and should be easy to tell because there should be a pop-up on your tv that asks if you wish to allow an adb connection. All you have to do is select allow, and if you choose, you can select remember this device, in which case the pop-up won’t appear again.
It’s all done! All that remains is for you to come up with creative ways to activate your methods for the remote buttons. I have written a script that uses gesture control to navigate my fire-stick! The options are endless, this is just the barebones to get you started experimenting with python control of your firestick. I hope you enjoy putting this to good use!
Here is a follow up article to show you how to add gesture control using opencv and mediapipe to control the fire-stick!


Comments
Post a Comment